

Follow as we make a quilt look easy.
- estrellalite

- Jan 13, 2022
- 6 min read
Updated: Jul 13, 2022
By Magnolia & Willows
Well I did it again. After promising myself I would use from my ever growing fabric stash instead I purchased a quilt kit.

Disclaimer- I have to tell you this
Keep in mind that we may receive commissions when you click our links and make purchases. However, this does not impact our reviews, opinions or comparisons.
I’m sure I won’t stay mad at myself for long, because this quilt is coming along quick and easy thanks to it being precut.
Have you ever tried a precut quilt kit? Not jelly rolls, these quilts require no cutting! Just find a design you like, order from trusted source and wa-la all you have left to do is sew.

I enjoy that so much, not having to worry about choosing patterns, matching fabric, precise cutting and misplacing pieces. Moreso with a little one underfoot.
This tutorial should be quick and easy. I think next quilt I’ll cut myself and pick my own fabrics for a change, but anyway…
This quilt is gift for dear loved ones. It is actually a very late Christmas present😨.
So I need to get this sewn quickly, easily and correctly.
I wanted to write a post on how to make a quilt for anyone thinking of taking up this heirloom craft. Maybe you always wanted to make at least one, but it seemed too challenging.
I promise I’m going to make it look easy.
A note first- these instructions assume you have a basic knowledge of machine sewing. If you do not please read our article “Basic Machine Sewing”.
The first step was to take everything out of the bag and see what we have.
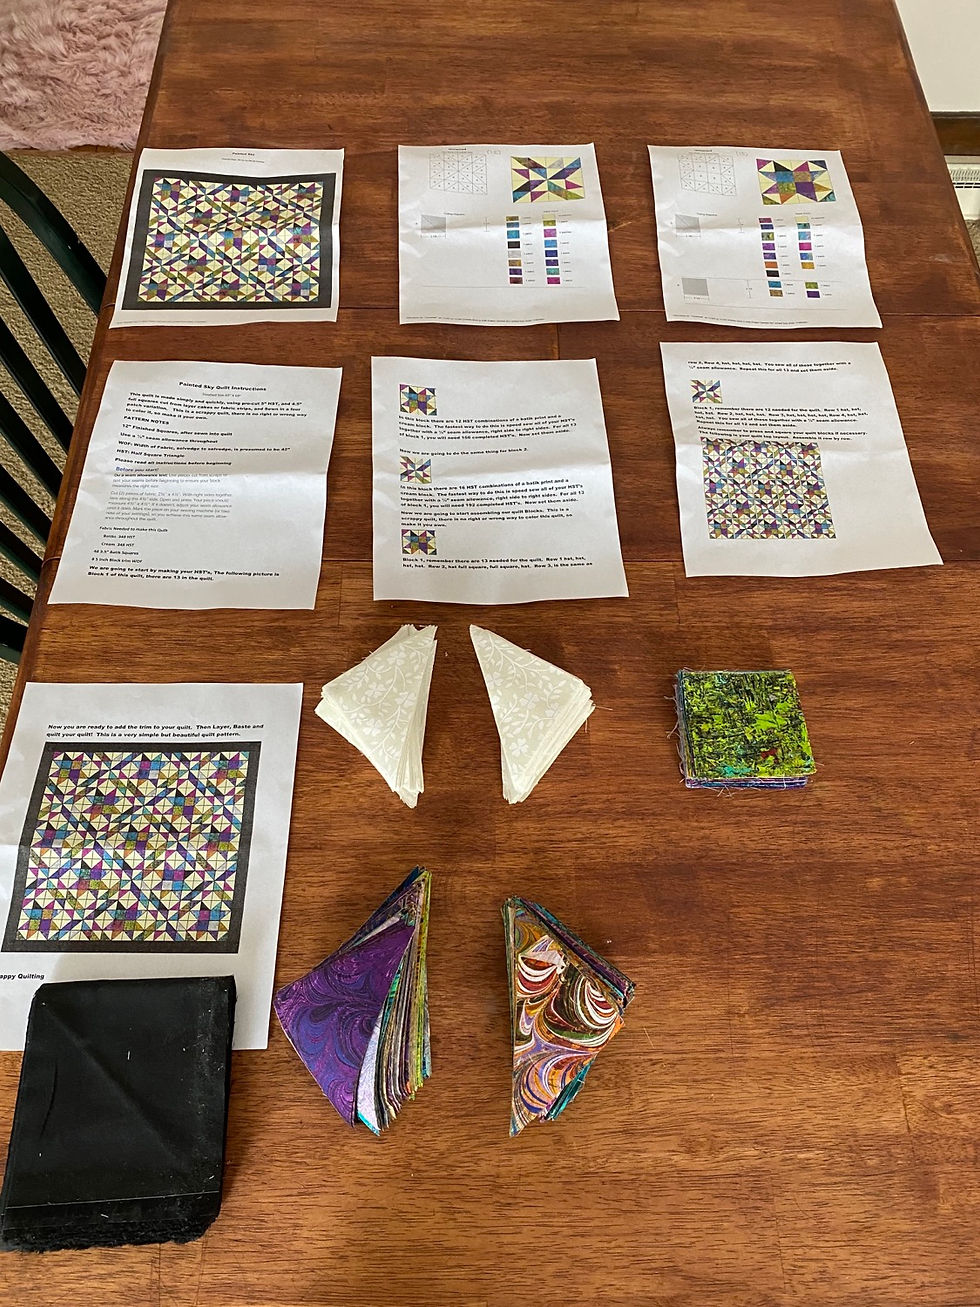
•Instructions
• 480 triangle pieces
• 52 squares
• 30 long black pieces
Well this don’t look too hard (lol).
I separated the fabric out placing them by color and size because I want to make sure I mix up the many colors throughout the quilt. I sure don’t want all the purples or yellows right next to each other.

That’s better, nice and organized. Now we can easily see we have 21 sets of color triangles, a whole slew of white triangles, 21 squares and some black edge rectangles.
It look like a lot of work, but we gonna make it so quickly. This pattern is easy! We sew one white triangle to one color triangle. Make sure to sew on the long edge of triangles, not the short sides.

In order to make this quick and easy I pinned as many triangles together as I could and put them in a pile.
I took pile to sewing machine and sewed them all one at a time into a long string. This is fine method as long as you put a lock stitch at beginning and end of each triangle.
what I mean by that is I simply start sewing at beginning of triangle, then after 3 stitches I go backwards and sew 2 stitches before I continue sewing forward. Those extra backward stitches act like a knot to make sure stitches don’t unravel later in the wash.
Heres a picture of many triangles sewn.

I’ll take scissors and carefully cut between each triangle. If ur feeling discourage, please don‘t. This is actually the hardest and longest part because there are 348 triangles to sew! But after we get these done then each square we join gets bigger and bigger😅
Next is a very important step. We have to iron each triangle open. I make sure to firmly pull each seam while I iron so they lay very flat.
I make sure to hide darker fabric by ironing the seam toward the darker side of blocks.

After all triangles are sewn and ironed(whew) we can get to the fun.
The precut kit I purchased comes with instructions and pictures.
Looking at the design I see there are two types of blocks in this quilt. I will lay out our ironed squares and the squares that came in kit to match the pictures.

After I lay out squares and make sure they match pattern, I then pin one square to the next so I can take a stack of 8 sets of squares to machine to sew.

I put my pin close to the seam I’m going to sew so I can remember which side of square to sew.
After they are sewn, iron the seams making sure to push dark fabric seams under dark fabric.
Lay blocks out on table again. Make sure to check pattern against blocks.
Now we get to sew the blocks to each other again.
I pin the blocks like this.


I bet you can guess what I’m going to say next- sew the seams, then iron.
We return to table with four strips now.
Sew the four strips together like this.

Here they are pinned ready to sew.

We almost have our block! One more time we will sew and iron the strips together.

Ta-da! We made a quilt block.❤️
I do need to talk about points and quality for a minute. It is important that each seam lines up together, so when I’m pinning and sewing I am constantly checking that the point on each block matches another point or corner.
A quilt is a square on a square over and over so if I don’t take my time and match the seams as good as I can then as each block grows the size mistakes will become larger and more noticeable.
Also you can see a mistake in the gray square on the picture. It looks like I made the seam too small all the way back at the beginning of my sewing the triangles. So when I joined and joined the mistake became noticeable because the fabric in that square was longer than everyone else.

Since this is a gift I will rip seams open, Reese the gray triangle, then resew all seams so that little pleat isn’t there.
If this had been for myself I would have loved to leave the pleat or add a couple hand stitches in a gold or red color thread.
There are many cultures that embrace a flaw as a sign of craftsmanship.
Kintsugi - The Japanese art practice of repairing a flaw and leaving the repair visible.
A metaphor for embracing flaws and imperfections.

There are also religious traditions that will make a mistake on purpose in a quilt. The mindset is that only God can create a perfect masterpiece.
I mention my mistake to tell you this- Finished is better than perfect. If this is your first quilt just keep going!
And this idea is more than just this quilt. Anything in life, just keep going!
It wasn’t easy to start with 482 triangles and 52 squares, but if I try and don’t give up, sew and iron, mind my points, then I can end up with a cherished quilt that will bring joy to someone’s life.
Circling back to this quilt. I simply continue sewing and ironing until all blocks are done.

Once we have all 25 blocks sewn we will sew each block together like this picture.

But I will show you the principle of how to bind and sew a quilt on your home machine.
Once all squares are sewn this whole square thing is called the quilt top.
We lay down on backing fabric on a table or floor.With the pretty side down.

Place the quilt batting on top making sure to have all corners even. (Don’t prewash the batting- it will fall apart in washer😂).

Start pinning in the middle of the quilt. Be diligent to make the fabric tight, all 3 pieces need to be as flat as possible.


When the whole thing is pinned, roll each side up like this.


Now this quilt will fit in your home machine.
Make sure to start sewing in the middle of quilt and check your work by unrolling quilt and checking pins are still tight throughout this process.
We are trying to avoid a loose marriage between the quilt, batting and backing.

Please remember these things as you sew.
• Take your time and enjoy your work.
• Don’t give up. Finished is better than perfect.
If you love the idea of an easy quilt, remember you can purchase this exact pattern or even cuter ones from Material Maven here.
If you love it, but don’t want to make it that’s great too! Our shop Magnoliawillow.com would love to make it for you. We plan to add quilts to our store in February 2022.
Our store webpage also features our blog where you can find plenty of articles about quilts, candles and home decorating crafts.
Thank you for reading, we sincerely hope you enjoyed and maybe learned. Please feel free to ask any questions in the comment section and we will respond.


That quilt with the Vibrant colors looks awesome